A few months ago Facebook released Account Kit which “helps people quickly and easily register and log into your app using their phone number or email address as a passwordless credential”.
Account Kit is really really helpful for a couple of reasons; users don’t need to remember a password for your app, it supports SMS-based authentication for hundreds of countries, and it’s really easy to setup.
The Firebase platform provides a number of tools like Firebase Authentication which remove alot of the friction involved in building high quality apps. Using Firebase Authentication, you can easily integrate Facebook, Twitter, and Google Login in your Android app.
Unfortunately, the Firebase Authentication SDK does not currently provide a direct way to authenticate users with Facebook Account Kit, however, this can be achieved using Firebase Custom Authentication. This tutorial will show you how. Firebase Custom authentication allow users to authenticate against an external or legacy authentication mechanism. We will treat Facebook Account Kit as a legacy authentication mechanism.
This tutorials assumes you’ve already configured your android project to use Firebase Authentication. If you haven’t yet, you can follow the instructions here. I also assume you’ve already set up your app to use Facebook Account Kit. You can follow set up instructions here.
Server setup
To use Custom Authentication, we need to setup an authentication server, which creates custom tokens, which can then be used sign into the Firebase Authentication service in the android app. Firebase only has Server SDKs for Java and NodeJS (at the moment), so you need to build your authentication server using one of the 2 languages. We will use Java for this tutorial, and we’ll use Google Appengine Cloud endpoints, as our hosting solution, for simplicity (because all the code can live inside Android Studio).
You should be able to follow this tutorial without in-depth knowledge of how Google Cloud endpoints work. If you want a basic understanding of how they work, you can start here.
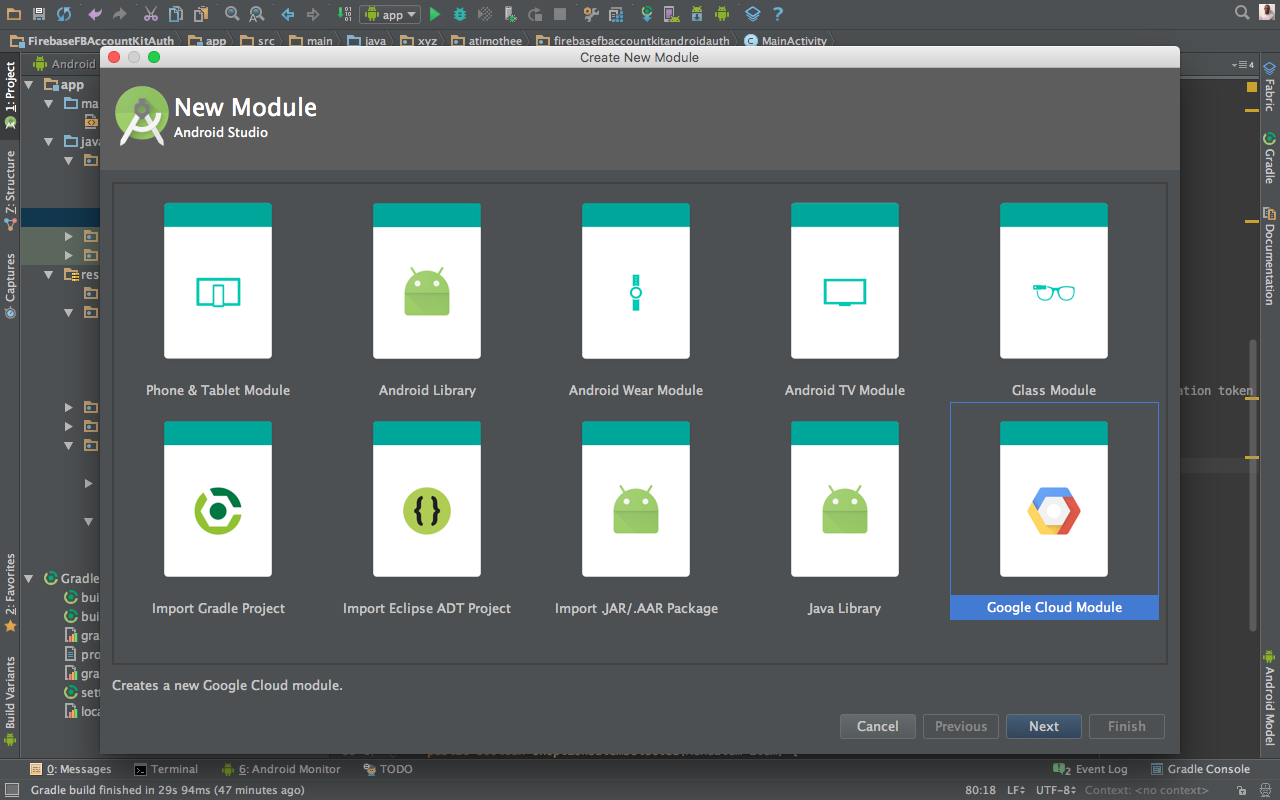
Adding Cloud Endpoints to an Android Studio project is trivial. Go to File > New > New Module … and select Google Cloud Module as shown in screenshots below.
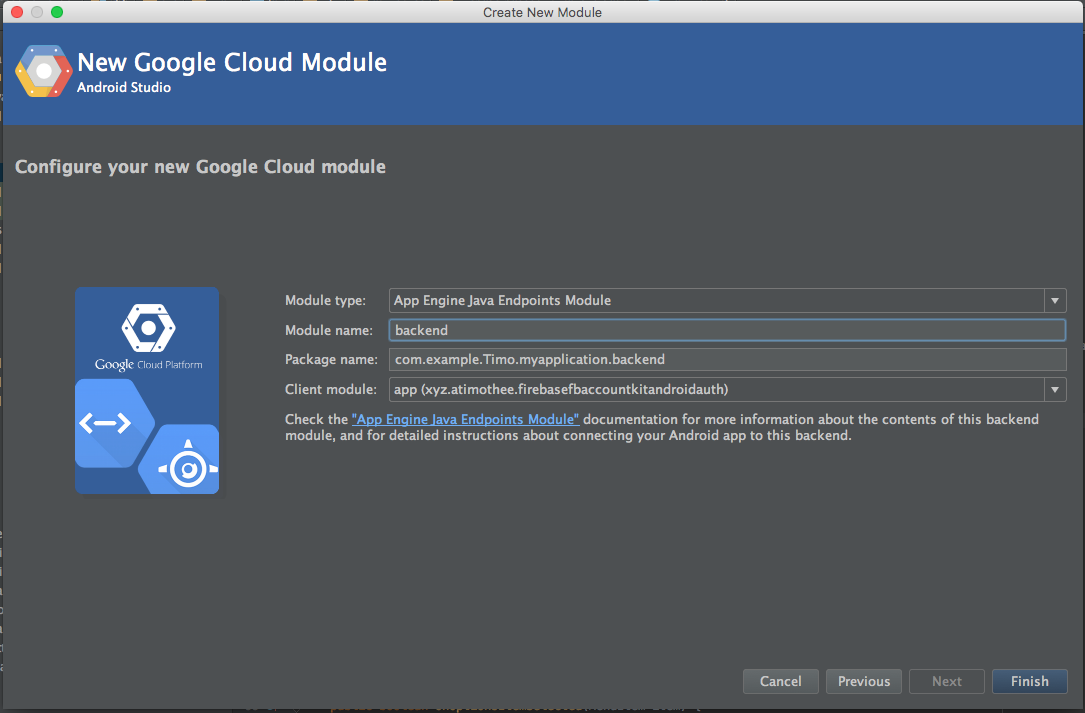
Once your project’s done building, you should have a new module/directory called backend, or whatever you named your Google cloud module.
Next, you need to add Firebase Server SDK and Retrofit to the build.gradle for the backend module as shown below. We will be using Retrofit to make a call to the AccountsKit Graph API to access the user’s basic information and save to Firebase, and also use it to create a custom token. Please note that you must not use retrofit v2 or higher (if you’re using Cloud endpoints), because it’s not compatible with appengine runtime environment.
compile 'com.squareup.retrofit:retrofit:1.9.0'
compile 'com.squareup.okhttp:okhttp:2.7.2'

compile 'com.google.firebase:firebase-server-sdk:[3.0.0,)'
First, we need to create the Bean that will return the custom token to the user.
public class CustomTokenBean {
    String token;

    public void setData(String data) {
        this.token = data;
    }

    public String getData() {
        return this.token;
    }
}
Next, we will use retrofit to retrieve the user’s details, using the Account Kit access token.
Here’s the class that matches the JSON returned by the AccountsKit Graph API. We will use it as the return type for the retrofit function.
public class AccountsKitUser {

    public AccountsKitUser(){

    }

    private String id;
    private Phone phone;

    public String getId() {
        return id;
    }

    public void setId(String id) {
        this.id = id;
    }

    public Phone getPhone() {
        return phone;
    }

    public void setPhone(Phone phone) {
        this.phone = phone;
    }

    static class Phone{
        public Phone(){

        }

        private String number;
        private String countryPrefix;
        private String nationalNumber;

        public String getNumber() {
            return number;
        }

        public void setNumber(String number) {
            this.number = number;
        }

        public String getCountryPrefix() {
            return countryPrefix;
        }

        public void setCountryPrefix(String countryPrefix) {
            this.countryPrefix = countryPrefix;
        }

        public String getNationalNumber() {
            return nationalNumber;
        }

        public void setNationalNumber(String nationalNumber) {
            this.nationalNumber = nationalNumber;
        }
    }
}
Here’s the retrofit adapter and interface that retrieves the user information.
public static final String API_BASE_URL = "https://graph.accountkit.com";

    private static RestAdapter.Builder builder = new RestAdapter.Builder()
            .setEndpoint(API_BASE_URL)
            .setClient(new UrlFetchClient());

    public static <S> S createService(Class<S> serviceClass) {
        RestAdapter adapter = builder.build();
        return adapter.create(serviceClass);
    }


    public  interface GetUserDetailsService{
        @GET("/v1.0/me")
        AccountsKitUser getUserDetails(@Query("access_token") String accessToken);

    }
Once we have the user id, we can then use the Firebase SDK to create a custom token.
In order to communicate with the Firebase service, you will need a service account, and configuration file with your service account credentials. Follow the instructions here to obtain a JSON configuration file and add it to your backend module (under the WEB-INF folder).
Next, you need to add the json file as a resource to the appengine-web.xml to allow read access to the service account json file. The appengine-web.xml file is located in the WEB-INF folder. If you cannot see this folder, you may need to switch to the project view in Android Studio.
<?xml version="1.0" encoding="utf-8"?>
<appengine-web-app xmlns="http://appengine.google.com/ns/1.0">
    <application>project-id</application>
    <version>1</version>
    <module>backend</module>
    <threadsafe>true</threadsafe>

    <system-properties>
        <property name="java.util.logging.config.file" value="WEB-INF/logging.properties"/>
    </system-properties>
    <resource-files>
        <include path="/**.json" />
    </resource-files>
</appengine-web-app>
Please note that the json configuration file must be in the WEB-INF folder, otherwise it will not be accessible in code.
Since Firebase, is now part of Google Cloud Platform, a Firebase project == a Google Cloud project, and therfore can access other Google Cloud APIs and services, therefore you can use your firebase-project-id as the project-id in the appengine-web.xml. Alternatively, you could create a new Google cloud project, and specify the application name. (Please note: Appengine has a free quota, and you should be able to signup without needing a credit card.)
We then create an endpoint, that creates and returns the custom token to the user. You can use the users phone number or the their id as the uid (depending on your app’s requirements).
@ApiMethod(name = "getCustomToken")
    public CustomTokenBean getCustomToken(@Named("access_token") String accessToken) throws FileNotFoundException {


        GetUserDetailsService getUserDetailsService = createService(GetUserDetailsService.class);
        AccountsKitUser retrofitResponse = getUserDetailsService.getUserDetails(accessToken);
        String uid = retrofitResponse.getPhone().getNumber();
        FirebaseOptions options = null;
        options = new FirebaseOptions.Builder()
                .setServiceAccount(new FileInputStream(
                        new File("WEB-INF/json_file_name.json")))
                .setDatabaseUrl("https://firebase-project-id.firebaseio.com/")
                .build();
        FirebaseApp.initializeApp(options);
        String customToken = FirebaseAuth.getInstance().createCustomToken(uid);

        CustomTokenBean response = new CustomTokenBean();
        response.setData(customToken);

        return response;
    }
Next, you need to deploy the backend module to appengine, in order to be able to use it. To do this, go to Build> Deploy Module to Appengine… and login with your google account.
Now, for the Android part…
In your sign-in activity’s onCreate method, get the shared instance of the FirebaseAuth object:
private FirebaseAuth mAuth;
// ...
mAuth = FirebaseAuth.getInstance();
Create an AsyncTask which sends an AccountKit token, to the authentication server, receives the custom token from the authenticaiton server, and then signs in the user into Firebase using the custom token:
class LoginUserAsyncTask extends AsyncTask<String, Void, String> {


        @Override
        protected void onPostExecute(String token) {
            super.onPostExecute(token);
            //uses returned custom token to login to Firebase
            mAuth.signInWithCustomToken(token).addOnCompleteListener(MainActivity.this, new OnCompleteListener<AuthResult>() {
                @Override
                public void onComplete(@NonNull Task<AuthResult> task) {

                    // If sign in fails, display a message to the user. If sign in succeeds
                    // the auth state listener will be notified and logic to handle the
                    // signed in user can be handled in the listener.
                    if (!task.isSuccessful()) {
                        Toast.makeText(MainActivity.this, "Authentication failed.",
                                Toast.LENGTH_SHORT).show();
                    }
                }
            });
        }


        @Override
        protected String doInBackground(String... strings) {

            //sends AccountKit token to authentication server
            String accountsKitAccessToken = strings[0];
            MyApi.Builder builder = new MyApi.Builder(AndroidHttp.newCompatibleTransport(), new AndroidJsonFactory(), null);
            builder.setRootUrl("https://backend-dot-fb-accountkit-auth-demo.appspot.com/_ah/api");
            builder.setApplicationName("fb-accountkit-auth-demo");
            MyApi service = builder.build();
            try {
                CustomTokenBean customTokenBean = service.getCustomToken(accountsKitAccessToken).execute();
                return customTokenBean.getData();
            } catch (IOException e) {
                e.printStackTrace();


            }
            return null;
        }
    }
At the point where you initiate the user login via AccountsKit. You must set the responseType to TOKEN, so that an access token is returned to the calling activity once the login process is complete.
public void onLoginPhone(final View view) {
final Intent intent = new Intent(this, AccountKitActivity.class);
AccountKitConfiguration.AccountKitConfigurationBuilder configurationBuilder =
new AccountKitConfiguration.AccountKitConfigurationBuilder(
LoginType.PHONE,
AccountKitActivity.ResponseType.TOKEN); // you must use TOKEN response type
intent.putExtra(
AccountKitActivity.ACCOUNT_KIT_ACTIVITY_CONFIGURATION,
configurationBuilder.build());
startActivityForResult(intent, APP_REQUEST_CODE);
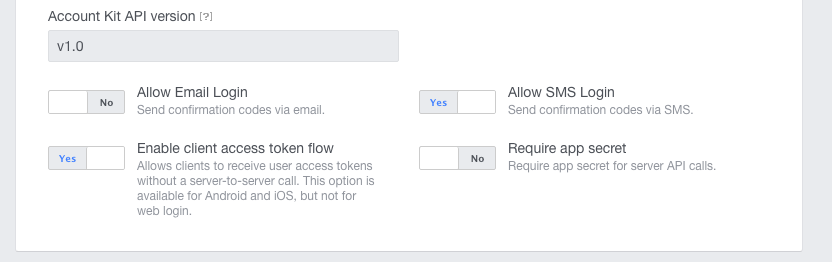
}Please note that to be able to use the TOKEN response type, you must enable client access token flow in the Facebook developer console, as shown in the screenshot below.
Next, you need to adapt the onActivityResult method in the Activity that initates the Account Kit login, to execute the LoginUserAsyncTask, once the accountkit user access token is obtained.
@Override
    protected void onActivityResult(
            final int requestCode,
            final int resultCode,
            final Intent data) {
        super.onActivityResult(requestCode, resultCode, data);
        if (requestCode == APP_REQUEST_CODE) { // confirm that this response matches your request
            AccountKitLoginResult loginResult = data.getParcelableExtra(AccountKitLoginResult.RESULT_KEY);
            String toastMessage = null;
            if (loginResult.getError() != null) {
                toastMessage = loginResult.getError().getErrorType().getMessage();
                //showErrorActivity(loginResult.getError());
            } else if (loginResult.wasCancelled()) {
                toastMessage = "Login Cancelled";
            } else {
                if (loginResult.getAccessToken() != null) {

                    String accessToken = loginResult.getAccessToken().getToken();

                    new LoginUserAsyncTask().execute(accessToken);

                    toastMessage = "Success:" + loginResult.getAccessToken().getAccountId();

                } else {
                    toastMessage = "Login failed";
                }

            }
            Toast.makeText(
                    this,
                    toastMessage,
                    Toast.LENGTH_LONG)
                    .show();
        }
    }
Finally, you need to setup an AuthStateListener that responds to changes in the user’s sign-in state:
private FirebaseAuth.AuthStateListener mAuthListener;

// ...

@Override
protected void onCreate(Bundle savedInstanceState) {
    // ...
    mAuthListener = new FirebaseAuth.AuthStateListener() {
            @Override
            public void onAuthStateChanged(@NonNull FirebaseAuth firebaseAuth) {
                FirebaseUser user = firebaseAuth.getCurrentUser();
                if (user != null) {
                    // User is signed into Firebase

                } else {
                    // User is signed out of Firebase
                    // Check if user is still signed into FB AccountKit
                    AccessToken accountKitAccessToken = AccountKit.getCurrentAccessToken();

                    if (accountKitAccessToken != null) {
                        //user is already logged into FB AccountKit, skip login, and try to authenticate Firebase
                        new LoginUserAsyncTask().execute(accountKitAccessToken.getToken());
                        startActivity(new Intent(MainActivity.this, LoggedInActivity.class));


                    } else {
                        //Handle new or logged out user
                    }

                }
                // ...
            }
        };
    // ...
}

@Override
public void onStart() {
    super.onStart();
    mAuth.addAuthStateListener(mAuthListener);
    // ...
}

@Override
public void onStop() {
    super.onStop();
    if (mAuthListener != null) {
        mAuth.removeAuthStateListener(mAuthListener);
    }
    // ...
}
In this post, we looked at how to authenticate Firebase app users using Facebook AccountKit. The code is available on Github. The best way to utilize this post is to clone the app, import it into Android Studio and play with the code yourself using this post as a guide.
It should be possible to write your authentication server in NodeJS, or any other Java framework, and run it wherever you like. You can read more here on how to implement custom authentication.
Got any questions? Ping me on Twitter: @TimAsiimwe, I’d be happy to chat!
References:
https://github.com/square/retrofit/issues/1149 http://stackoverflow.com/questions/31507370/reading-java-resource-files-in-google-appengine https://firebase.google.com/docs/auth/android/custom-auth